Sunday, September 21, 2014

Very tall socks

by Kelly Griffith

Taken from

Knitty: little purls of wisdom

Striped, solid, or spotted socks like these will keep your legs warm whatever the weather.
These very tall socks are knit in affordable acrylic, but if you've got a stash of wool in a similar gauge, go right ahead!
Do wear them with garters. It's the thing.
Let winter do its worst -- you can keep your skirts!


SIZE
One size fits thighs 17 - 24 inches around
 
FINISHED MEASUREMENTS
Top circumference: 16 inches
Length: 30 inches
 
MATERIALS
 Red Heart Classic [100% acrylic; approx. 198 yd/181 m per 3.5 oz/99 g) skein]; color: #12 Black
 TLC Essentials [100% acrylic; approx 326 yd/298 m per 6 oz/170 g skein]; color: Cranberry
 Red Heart Classic [100% acrylic; approx. 198 yd/181 m per 3.5 oz/99 g skein];
color: #289 Copper

 TLC Essentials [100% acrylic; approx 326 yd/298 m per 6 oz/170 g skein]; color: Dark Plum; less than 0.5 skein required
 Caron Simply Soft [100% acrylic; 315 yd/283 m per 6 oz/170 g skein]; color: Dark Sage
 Lionbrand Wool-Ease [80% acrylic, 20% wool; 197 yd/180m per 3 oz/85g skein]; color: #152 Oxford Grey

Note: less than one half of each skein was used for the socks shown
 1 set of 5 US #2/2.75mm double-point needles
 Stitch markers
 Row counter
 Spare needle or stitch holder
 Tapestry needle
GAUGE
20 sts/36 rows = 4" in stockinette stitch
 
STITCH PATTERN
1x1 Rib (worked over an even number of sts):
Round 1: [K1, p1] around.
This round forms 1x1 rib.
 
PATTERN NOTES
[Knitty's list of standard abbreviations can be found here]
If you wish to make the top of the sock larger in circumference, CO more sts and work one extra pair of decreases for every 2 extra sts. Every 5 extra sts will add an inch to the circumference (though it is advisable to add even numbers of sts so that decreases will remain symmetrical).
In the stockings shown, I used each color for 15 rows (black, red, purple, orange, green, gray). Stripes are a great way to use up half skeins of yarn leftover from other projects -- make up your own stripe patterns! I've left the color changes out of the pattern to make it less confusing.
 
DIRECTIONS
Sock (Make 2)CO 90 sts, and distribute as follows over 4 needles: 23 sts on first and fourth needles, 22 sts on second and third needles. Place marker and join to begin working in the round, being careful not to twist.The point at which the join happens will be the center back of the sock.Work in 1x1 rib for 15 rounds.IMPORTANT NOTE: Rows (rounds) will be counted from this point.
Work in stockinette st for 92 rounds.
Set-up Rnd: K22, place marker, k46, place marker, k22.
Shaping Rnd: K to 2 sts before first marker, k2tog, k to second marker, slip marker, k2tog, k to end of round.
[Work 3 rnds even. Work Shaping Round.] 3 times. 82 sts rem. (Rnd 106 just worked.)
Work 38 rnds even. (Round 144 just worked.)
[Work Shaping Rnd. Work 1 round even.] 13 times. 56 sts rem. (Rnd 170 just worked.)
Work Shaping Rnd once more. 54 sts rem.
Work 68 rounds even. (Rnd 239 just worked.)
Shape footPlace first 14 and last 13 sts of round onto one dpn: the heel flap wil be worked on these 27 sts. Place rem 27 sts on a st holder or piece of waste yarn.
Work in stockinette st until heel flap measures 2.5 inches, ending with a RS row.
Work Short-Row Heel ShapingRow 1 [WS]: P15, p2tog, p1, turn.
Row 2 [RS]: Sl1 kwise, k5, k2tog, k1, turn.
Row 3 [WS]: Sl1 pwise, p6, p2tog, p1, turn.
Row 4 [RS]: Sl1 kwise, k7, k2tog, k1, turn.
Row 5 [WS]: Sl1 pwise, p8, p2tog, turn.
Row 6 [RS]: Sl1 kwise, k9, k2tog, k1, turn.
Row 7 [WS]: Sl1 pwise, p10, p2tog, turn.
Row 8 [RS]: Sl1 kwise, k11, k2tog, turn.
Row 9 [WS]: Sl 1 pwise, p12, p2tog, turn.
Row 10 [RS]: Sl1 kwise, k13, k2tog, turn.
Row 11 [WS]: Sl1 pwise, p14, p2tog. 16 sts rem.
Turn work so RS is facing.
Pick up and k 15 sts along left side of heel flap. Using a second dpn, work across 27 sts on front of foot. Using a third dpn, pick up and k 15 sts along rem side of heel flap, and k 8 sts from heel flap. (Sts should now be distributed as follows: 23 sts on first and third needles, 27 sts on second needle. 73 sts. NOTE: Foot will be worked using four needles instead of five.)

Shape InstepRnd 1: K to last 3 sts on first needle, k2tog, k1, k across all sts on second needle, k first st on third needle, k2tog, k to end.
Rnd 2: K all sts.
Work these 2 rnds 8 times more. 55 sts rem.
Next Rnd: K to last 3 sts on first needle, k2tog, k1, k all sts on second and third needles. 54 sts. (13 sts on first needle, 27 sts on second needle, 14 sts on third needle.)
Work even until work from base of heel measures 3 inches less than total length of foot.
Shape ToeNext Rnd: K to last 3 sts of first needle, k2tog, k1, k first st of second needle, k2tog, k to last 3 sts of second needle, k2tog, k1, k first st of third needle, k2tog, k to end.
Next Rnd: K all sts.
Work these 2 rnds 5 times more. 30 sts rem.
Work first rnd only, 4 times. 14 sts rem.
Work sts on first needle only then break yarn, leaving a 12 inch tail.
Transfer sts on third needle to first needle: 7 sts on first needle and 7 sts on second needle.
Using Kitchener stitch, graft sts on first needle to sts on second needle.
 
FINISHING
Weave in all ends.
ABOUT THE DESIGNER
Kelly Griffith is a native Philadelphian who wandered into the Green Mountains a few years ago and never came back down.
She is an avid knitter, photographer, and a cunning linguist.

STITCH SURFER

beauty shot
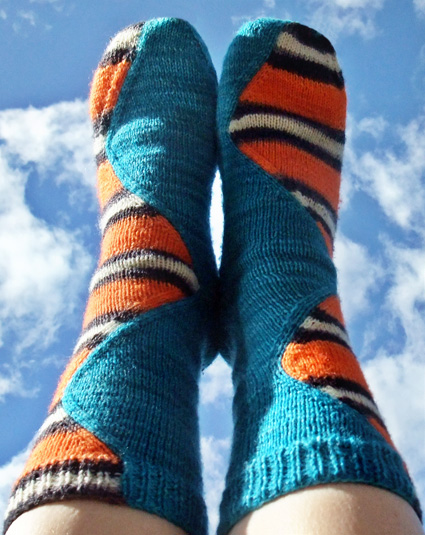
These are not crocheted but knitted. I fell in love with socks when I saw them and knew I just had to share them.
I found this pattern on knitty.com
and it was designed by:

designername

Louise Robert lives in metropolitan Montreal, Quebec where she earned a Bachelor of Arts in art history. She lives with her husband and her 3 kids, 2 cats and one beloved angora rabbit.

She is the owner of Biscotte & Cie, a yarn shop where she hand-dyes yarn in all kinds of self-striping, semi-solid and variegated colourways.


SIZE
S[M, L


FINISHED MEASUREMENTS
Sock circumference: 8.5 [9.5, 10.5] inches
Foot length: Adjustable to Fit.
Leg length: Adjustable. Samples shown have leg 9 inches long, measured from the bottom of the heel.

spacer
MATERIALS
Yarn
Biscotte & Cie - Felix semi-solid [80% superwash merino, 20% nylon; 420yds/384m per 115g skein], 1 [1, 1] skein each of MC and CC
Colourways for each pair (shown left to right in photo below)
spacer [MC] 1) Nuit, 2) Turquoise, 3) Raisin malin, 4) Chocolat, 5) Limonade
spacer [CC] 1) Go Habs Go, 2) Clown Fish, 3) Purple rain, 4) Chou, Hibou, Genou, 5) Pâturage

Recommended needle size
[always use a needle size that gives you the gauge listed below -- every knitter's gauge is unique] 
spacer US #1.5/2.5 mm needles for working in the round
Notions
spacer Yarn needle


GAUGE

32 sts/46 rounds = 4 inches in stockinette stitch

PATTERN NOTES
[Knitty's list of standard abbreviations and techniques can be found here.]

Instructions for Judy's Magic Cast-On can be found here.
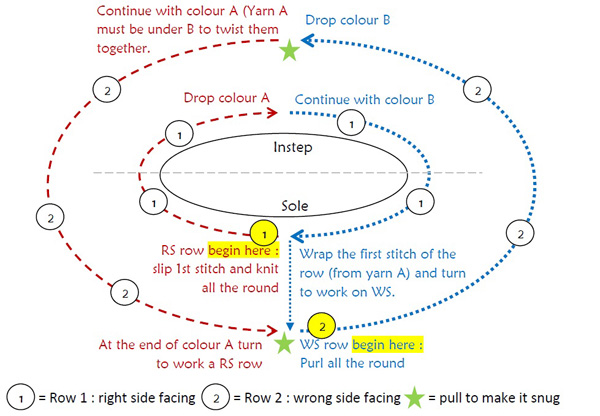
The socks are worked using the intarsia technique in the round. When changing colors, twist them around each other so that no holes are created. See below:


KRL: Knit right loop. Insert right hand needle into stitch 1 row below stitch on left hand needle. Place on left hand needle. Knit stitch just picked up through front loop.

PRL: Purl right loop. Insert right hand needle into stitch 1 row below stitch on left hand needle. Place on left hand needle. Purl stitch just picked up through front loop.

Note: The wraps from the w&t do not need to be hidden -- they are part of the design.

DIRECTIONS
spacerFIRST SOCK
Toe
Using MC, and Judy's Magic Cast On, CO 32 sts - 16 sts on each of two needles.

Setup round: Knit one full round, the first 8 sts of the next round. You are now in the middle of sole sts and this is the new start of the round.
If you're working on two circulars or magic loop, the first and last 8 sts of the round form the sole, the center 16 sts form the instep. If you're working on DPNs, distribute your sts so that the first 8 are on one needle, the next 16 sts (the instep) are one one or two needles as you prefer, for the instep, and the rem 8 sts (the other half of the sole) are on the last needle.

Note: when you join CC, start at the beginning of one of the color stripes.

Round 1 [RS]: With MC, k6, kfb, k2, kfb, k6. Drop MC, join CC, k6, kfb, k2, kfb, k6, w&t. 4 sts increased. 

Round 2 [WS]: With CC, p18. Drop CC and with MC, p18. Turn your work.

Round 3 [RS]: With MC, sl1, k to 2 sts before start of instep kfb, k2, kfb, k to end of MC sts. Drop MC and with CC, k to 2 sts before end of instep, kfb, k2, kfb, k to end of round, w&t.

Round 4 [WS]: With CC, p all the CC sts. Drop CC and with MC, p all the MC sts. Turn your work.
Work Rounds 3 & 4 until you have a total of 60 [64, 68] sts.

Foot

Surf Left:
Round 1 [RS]: With MC, sl1, kfb, k until 3 MC sts remain, k2tog, k1. Drop MC and with CC, k1, kfb, knit until 3 CC sts remain, k2tog, k1, w&t.

Round 2 [WS]: With CC, p all the CC sts. Drop CC and with MC, p all the MC sts. Turn your work.

Repeat Rounds 1 and 2 until 5 MC sts remain before the start of the instep.

Stop Surfing:
Round 1 [RS]: With MC, sl1, k all MC sts. Drop MC and with CC k all CC sts, w&t.
Round 2 [WS]: With CC, p all the CC sts. Drop CC and with MC, p all the MC sts. Turn your work.
Repeat Rounds 1 & 2 once more.

Surf Right:
Round 1 [RS]: use MC and sl1, ssk, knit until 2 MC sts remains, kfb, k1. Drop MC and with CC to k1, ssk, knit until 2 CC sts remains, kfb, k1, w&t.
Round 2 [WS]: With CC, p all the CC sts. Drop CC and with MC, p all the MC sts. Turn your work.
Repeat Rounds 1 and 2 until 5 CC sts remain after the instep.

Work the Stop Surfing Section.

Continue in this manner:
Surf Left
Stop Surfing
Surf Right
Stop Surfing

When the foot is 2 inches less than the desired length, start the heel. Stop after a WS row.

Heel
Heel is worked back and forth in rows with MC.

Heel setup row 1 [RS]: Work to start of instep in pattern as set, turn.
Heel setup row 2 [WS]: With MC, p30[32, 34], turn.

Row 1 [RS]: K29[31, 33], turn.
Row 2 [WS]: Sl1, p27[29, 31], turn.
Row 3 [RS]: Sl1, k26[28, 30], turn.
Row 4 [WS]: Sl1, p25[27, 29], turn.
Row 5 [RS]: Sl1, k24[26, 28], turn.
Row 6 [WS]: Sl1, p23[25, 27], turn.
Row 7 [RS]: Sl1, k22[24, 26], turn.
Row 8 [WS]: Sl1, p21[23, 25], turn.
Row 9 [RS]: Sl1, k20[22, 24], turn.
Row 10 [WS]: Sl1, p19[21, 23], turn.
Row 11 [RS]: Sl1, k18[20, 22], turn.
Row 12 [WS]: Sl1, p17[19, 21], turn.
Row 13 [RS]: Sl1, k16[18, 20], turn.
Row 14 [WS]: Sl1, p15[17, 19], turn.
Row 15 [RS]: Sl1, k14[16, 18], ssk, KRL, turn.
Row 16 [WS]: Sl1, p15[17, 19] p2tog, PRL, turn.
Row 17 [RS]: Sl1, k16[18, 20], ssk, KRL, turn.
Row 18 [WS]: Sl1, p17[19, 21], p2tog, PRL, turn.
Row 19 [RS]: Sl1, k18[20, 22], ssk, KRL, turn.
Row 20 [WS] Sl1, p19[21, 23], p2tog, PRL, turn.
Row 21 [RS]: Sl1, k20[22, 24], ssk, KRL, turn.
Row 22 [WS]: Sl1, p21[23, 25], p2tog, PRL, turn.
Row 23 [RS]: Sl1, k22[24, 26], ssk, KRL, turn.
Row 24 [WS]: Sl1, p23[25, 27], p2tog, PRL, turn.
Row 25 [RS]: Sl1, k24[26, 28], ssk, KRL, turn.
Row 26 [WS]: Sl1, p25[27, 29], p2tog, PRL, turn.
Row 27 [RS]: Sl1, k26[28, 30], ssk, KRL, turn.
Row 28 [WS]: Sl1, p27[29, 31], p2tog, PRL, turn.

RS is facing. 
Resume working in the round: With MC, k across heel sts, and continue across instep in surfing pattern as set.

Leg
Work as for the foot, repeating Surf Left, Stop Surfing, Surf Right and Stop Surfing sections until leg measure 9 inches from the bottom of the heel (or desired length).

Cuff
Round 1 [RS]: With MC, sl1wyib, [p1, k1] until 1 MC st remains, p1. Drop MC and with CC [k1, p1] to end, w&t.
Round 2 [WS]: With CC, [k1, p1] across all CC sts, Drop CC and with MC [k1, p1] to end of MC sts. Turn your work.

Repeat Rounds 1 & 2 for 1.5 inches.
Bind off loosely as follows: K1, *yo, k1; lift yarnover and previous knit st over; rep from * to end.

SECOND SOCK
Note: No matter what yarn you use, in order to have your color stripes match the first sock, you need to start casting on 12 inches up (that is, earlier in) the yarn from the start of the stripe you started with for FIRST SOCK. That is, if you started FIRST SOCK with a pink stripe, start casting on 12 inches before the start of the pink stripe yarn.

Toe
Work as for Toe of FIRST SOCK, reversing the colors.

Foot
Continue in pattern as set as for FIRST SOCK, ensuring colors are reversed, ending with a WS row.

Heel
Heel is worked back and forth in rows with MC.
Heel setup row 1 [RS]: Work to end of instep in pattern as set, stop.
Work Heel as for FIRST SOCK, starting with Row 1.

Resume working in the round:Â After last heel row, do not turn. Continue working around the WS to the end of the MC sts on the instep; drop MC and with CC p 30[32, 34], turn. Continue in surfing pattern as set.

Leg & Cuff
Work as for FIRST SOCK, ensuring colors are reversed.

Little Red Riding Hood


Need I say more, what little girl won't love this? As you can see I have taken this pattern from


SmåDROPS 24-37
DROPS design: Pattern no w-051-bn
Yarn group C
-------------------------------------------------------- 
Size: 3/4 - 5/6 - 7/8 - 9/10 - 11/12 years
Finished measurements:
Bust: 66-70-76-84-90 cm / 26"-27½"-30"-33"
Full length: 48-52-56-60-64 cm / 19"-20½"-22"-23½"-25 1/4"

Materials: 
DROPS PARIS from Garnstudio
550-600-650-700-800 g color no 12, red 

DROPS CROCHET HOOK size 6 mm / J/10 – or size needed to get 12 dc x 6 rows = 10 x 10 cm / 4'' x 4''. When working pattern A.1, approx. 2 repetitions of b in width = 8 cm / 3 1/8''. 

DROPS BUTTONS NO 532, INKA W/LOOP: 5-5-5-6-6 pieces

NOTE: This pattern is written in American English. All measurements in charts are in cm. For conversion from cm to inch - click here. There are different terms for crocheting in British and American English. If this pattern includes crochet, click for "crochet terms" here. For this pattern in British English, please click here.
CROCHET INFO: 
Replace first dc on row with 3 ch. 

PATTERN (also see diagram A.1): 
ROW 1 (= row marked with 1 arrow in diagram): 
1 ch up from 1st sc on previous row, [ch 3, then work 4 dc tog as follows (= 1 dc-group): * Work 1 dc in next sc but wait with last pull through *, repeat from *-* 4 times in total, make a YO and pull yarn through all 5 loops on hook, ch 1, 1 sc in next sc], repeat from [-] the entire row. Turn piece. 
ROW 2: ch 5 up from first sc, 1 sc at the top of first dc-group, * ch 3, 1 dc-group in 3-ch-space on previous row, ch 1, 1 sc at the top of next dc-group *, repeat from *-*, finish with 3 ch and 4 dc tog in last ch-space. Turn piece. 
ROW 3: ch 1, 1 sc at the top of first dc-group, * ch 3, 1 dc-group in 3-ch-space on previous row, ch 1, 1 sc at the top of next dc-group *, repeat from *-*, work last sc on row in 5-ch-space from previous row. Turn piece.
Repeat rows 2 and 3.

DECREASE TIP:
Dec 1 dc by working 2 dc tog as follows: 
Work 1 dc in first dc but wait with last pull through, work 1 dc in next dc but on last pull through, pull thread through all 3 loops on hook.
Dec 2 dc by working 3 dc tog as follows: 
Work 1 dc in first dc but wait with last pull through, work 1 dc in next dc but wait with last pull through, work 1 dc in next dc but on last pull through, pull yarn through all 4 loops on hook.

--------------------------------------------------------

BACK PIECE: 
Chain 61-63-68-73-78 with Paris on hook size 6 mm / J/10. 
Turn and work 1 dc in 4th ch from hook, continue with 1 dc in each of the next 2-4-4-4-4 ch, * skip ch 1, 1 dc in each of the next 4 ch *, repeat from *-* the entire row = 48-50-54-58-62 dc - READ CROCHET INFO! Continue with dc upwards on all rows. 
REMEMBER THE CROCHET GAUGE!
When piece measures 15 cm / 6'', dec 1 dc in each side by working the second and third dc and the 2 next to last dc tog – SEE DECREASE TIP! Repeat dec every 5-5-6-6-7 cm / 2"-2"-2½"-2½"-2 3/4" 3 more times = 40-42-46-50-54 dc. 
When piece measures 33-36-39-42-45 cm / 13"-14 1/4"-15 1/4"-16½"-17 3/4", dec for armholes in each side as follows: Work sl sts over the first 2-2-3-4-5 dc, then work dc until 2-2-3-4-5 dc remain, turn piece. Continue with dc, there are now 36-38-40-42-44 dc on row. 
Continue to work until piece measures approx. 47-51-55-59-63 cm / 18½"-20"-21½"-23 1/4"-24 3/4". 
Now work 1 row with dc only over the outermost 12-13-13-14-14 dc in each side for shoulder (the middle 12-12-14-14-16 dc = neck). Fasten off.

RIGHT FRONT PIECE: 
Chain 34-36-38-41-43 with Paris on hook size 6 mm / J/10. Turn and work 1 dc in 4th ch from hook, continue with 1 dc in each of the next 5-2-4-2-4 ch, * skip ch 1, 1 dc in each of the next 4 ch *, repeat from *-* the entire row = 27-28-30-32-34 dc. Continue with dc upwards on all rows (the 3 outermost dc towards mid front = band). 
When piece measures 15 cm / 6'', beg dec in the side as on back piece. 
When dec are done, 23-24-26-28-30 dc remain on row. 
When piece measures 33-36-39-42-45 cm / 13"-14 1/4"-15 1/4"-16½"-17 3/4", the outermost 2-2-3-4-5 dc towards the side are no longer worked. Continue with dc over the remaining 21-22-23-24-25 dc. 
When piece measures 43-47-50-54-57 cm / 17"-18½"-19 3/4"-21 1/4"-22½", the outermost 7-7-8-8-9 dc towards mid front are no longer worked. Then dec 1 dc towards mid front on the next 2 rows by working the 2 next to last dc towards mid front tog = 12-13-13-14-14 dc remain on shoulder. Fasten off when piece measures 48-52-56-60-64 cm / 19"-20½"-22"-23½"-25 1/4". 

LEFT FRONT PIECE: 
Work as right but reversed. 

SLEEVE: 
Chain 32-32-32-39-39 with Paris on hook size 6 mm / J/10. Turn and work 1 sc in 2nd ch from hook, then work 1 sc in each of the next 5-5-5-2-2 ch, * skip ch 1, work 1 sc in each of the next 4 ch *, repeat from *-* the entire row = 26-26-26-31-31 sc (first ch on row does NOT count as 1 sc). 
Continue with PATTERN as follows - also see explanation above and diagram A.1: Diagram a over the first 6 sc, diagram b 3-3-3-4-4 times and diagram c over the last 5 sc – beg with row marked with arrow. 
When 5 rows of diagram have been worked, piece measures approx. 8 cm / 3''. Continue with dc as follows: ch 3 (= 1 dc), * 1 dc at the top of first dc-group, 3 dc in 3-ch-space, 1 dc in sc *, repeat from *-* the entire row but finish with 3 dc in last 3-ch-space (do not work 1 dc in last sc) = 25-25-25-30-30 dc. Continue with 1 dc in every dc upwards. AT THE SAME TIME when piece measures 10 cm / 4'', inc 1 dc in each side by working 2 dc in second and next to last dc. Repeat inc every 2nd-2nd-2nd-3rd-3rd row 3-4-5-4-5 more times = 33-35-37-40-42 dc. 
When piece measures 26-30-34-37-41 cm / 10 1/4"-11 3/4"-13½"-14½"-16", beg dec for sleeve cap. Work sl sts over the first 3 dc, then work dc until 3 dc remain, turn piece. Ch 3, then work the next 3 dc tog – SEE DECREASE TIP! Work dc until 4 dc remain, work the next 3 dc tog, then 1 dc in last dc. Continue like this by working the 3 next to last dc on every row tog until piece measures 33-37-41-45-49 cm / 13"-14½"-16"-17 3/4"-19 1/4", fasten off.

ASSEMBLY:
Sew shoulder seams, side seams and sleeve seams edge to edge to avoid a chunky seam. Sew in the sleeves in body. 

HOOD: 
Work (from RS) approx. 30 to 40 sc around the neckline with Paris on hook size 6 mm / J/10. Turn and work sc while at the same time inc evenly (by working 2 sc in 1 sc) to 51-51-51-61-61 sc. 
Continue with PATTERN as follows - also see explanation above and diagram A.1: a over the first 6 sc, b until 5 sc remain and c over the last sc – beg with row marked with 1 arrow.
Continue pattern until hood measures approx. 28-29-30-31-32 cm / 11"-11½"-11 3/4"-12 1/4"-12½". Fasten off and sew the hood tog at the top.

BAND: 
Work an edge around the opening on jacket, beg at the bottom on right front piece, work up and around the hood and down along left front piece. 
Work with Paris on hook size 5 mm / H/8: Work approx. 181-191-201-211-221 sc, no of sts should be divisible by 5 + 11. Turn piece and continue with PATTERN according to diagram A.1: A.1a over the first 6 sc, A.1b until 5 sc remain and A.1c over the last sc – beg on row marked with arrow. Fasten off when A.1 has been worked 1 time vertically.

ASSEMBLY:
Fasten the buttons on left front piece, the top button approx. 2 cm / 3/4'' from neck, the bottom button approx. 8 cm / 3'' from bottom edge. Place the rest of the buttons evenly between these 2 buttons. 
Button through band on right front piece.
Diagram

= 1 sc
= 1 ch
= 1 dc


Do you need some help?

For further pattern help, please contact the store where you bought the yarn. Having bought DROPS yarn, you are guaranteed to receive qualified help from a store specializing in the DROPS patterns. You can also take a look at our tutorial videos.

All patterns are carefully reviewed, but we must make reservation for possible mistakes. All patterns are translated from Norwegian and you can always check the original pattern for measurements and calculations. Go to original pattern for design SmåDROPS 24-37. If you think you have found an error in the pattern, please post your remark or question in our Comments section.

© 1982-2014 DROPS Design A/S. We reserve all rights. This document, including all its sub-sections, has copyrights. This is for all of you with knitting as a hobby and for you who run a yarn store. Either way, the DROPS pattern database is at your free disposal. As a store you are welcome to use the DROPS pattern database to promote the sale of your assortment. Print out any pattern you may want, make as many copies as desired. The only thing we ask is that you don't make any changes / additions to the original printed document... and that the patterns according to the DROPS philosophy are given out to the consumers for free. 
The sale of garments based on DROPS DESIGN is permitted as long as they are sold as single items or per order. Further commercial use of the patterns is not permitted. It has to be clearly stated that the garment is made based on a design from DROPS DESIGN. The use of DROPS photos for marketing purposes/sales is only permitted when only DROPS yarns have been used. The photo may not be cut or edited and the logo should be clearly visible. The use of clothes labels of which DROPS DESIGN forms part is conditioned by the inclusion of the following text: “A DROPS DESIGN made by …..”. 
We reserve the right to withdraw the permission for use at any time, notwithstanding the reason.


DROPS Design


Wednesday, September 17, 2014

Ideas for Polymer Clay Canes


Here are 3 ideas to use clay. There is so much you can do with clay all you need is clay and an imagination. I have taken this from 

FaveCrafts.com


Materials:
Polymer clay canes (pre-made or handmade)
Bic ink pens (you must be able to remove the tip and ink from plastic pen body)
Glass candle cups
Assorted beads and bracelet/necklace findings
Toaster oven
Cutting blade
Instructions:
You can purchase pre-made canes online and at your local craft store. There are many instructions for making canes online.

Condition your canes by rolling and warming them in your hands. Once conditioned, using a cutting blade begin to cut thin slices. For beads have a depth of at least 1/4” to 1/2". For slices you will be applying to pen casing or candle cups your slices can be much thinner, so cut as many as you can from a cane.

You can get the large and small diameters from a can by slowly rolling it like a snake on a hard surface. For example: cut several slices while your cane is 1” in diameter; roll out to 3/4” and cut more slices; continue to roll out to 1/2" and cut slices; and so on. This will give you a nice variety of sizes when you cover a pen casing or candle cup.

For beads: cut thick slices; insert a pin to make the hole; lay on cooking sheet; place in toaster oven at temperature recommended by the polymer clay manufacturer, bake for 30 minutes or time recommended by manufacturer; allow to cool, and then string into bracelet or necklace.

For pen: remove tip/ink from pen; begin to lay slices of cane onto the pen casing using the warmth of your fingers to help the clay adhere to the plastic casing, cover entire pen casing with cane slices, but don’t cover the tip opening. Place pen onto cooking sheet, place in toaster oven at temperature recommended by manufacturer, bake 30 minutes or time suggested by manufacturer, allow to cool and then insert tip/ink back into pen.

For glass candle cups: begin to lay slices of cane onto the outside body of glass candle cup using the warmth of your fingers to help the clay adhere to the glass, cover entire glass candle cup with cane slices. Place glass candle cup onto cooking sheet, place in toaster oven at temperature recommended by manufacturer, bake 30 minutes or time suggested by manufacturer, and allow to cool.

Please remember that anything the polymer clay touches can no longer be used for food consumption and you should never leave baking polymer clay unattended.

How to Decorate Clay Pots

Decorative Clay Pots

Materials:
  • Clay pots
  • Acrylic paint (there is a specialty patio paint that also works well for this technique)
  • Paint palette (a glass or plastic plate works great for this and is great because it can be reused)
  • Pop-up sponges
  • Black permanent marking pen
  • Mosaic tiles (glass or plastic)
  • Mosaic glue
  • Grout
  • Plastic gloves (for grouting)
  • Wet wipes
  • Flat backed marbles
  • Silk leaves

Instructions:

 
Instructions for Stamping & Painting on Clay Pots

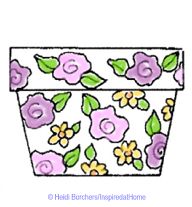
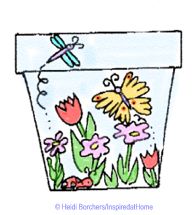
Cut pop-up sponge to desired shapes. A simple scalloped circle makes a great floral rose shape. Dip sponge into water and wring out excess. Pour paint onto palette. Dab sponge into paint. Keep dabbing in an up and down motion to evenly coat the surface of the sponge with paint. Determine placement on clay pot and press sponge and lift. Voila! It’s that easy. Continue until entire clay pot surface is covered. Let dry completely. Use black marking pen to outline design shapes and add detail to leaves and center of flowers. If you want to paint your own design, just transfer the pattern to your clay pot and paint, paint, paint!
Designer Tips: Keep in mind that if you want to use lighter colors of acrylic paint on the clay pot, you may need to first spray the outside of the pot with white Rustoleum paint for a base coat.
Floral Stamped Clay Pot
Floral Painted Clay Pot
 
Instructions for Mosaicing on Clay Pots

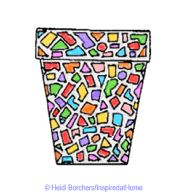
Working one section at a time, glue mosaic tiles onto outside surface of pot leaving small spaces in between tiles. Let glue dry completely. Mix grout according to package instructions. Apply grout over tile. Wipe off excess grout with sponge. Continue to clean surface of tiles with wet wipes. Let grout dry overnight and clean tiles with paper towel and Windex. (See Mosaic Techniques)
Designer Tips: If you want help your tiles stay in place while drying, just use a long strip of blue painters tape to hold sections in place. When the glue is dry, carefully remove the tape.
Mosaic Clay Pot
Instructions for Gluing on Clay Pots

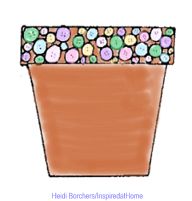
Select buttons or beads to glue along the top rim of clay pot. This project can take a little longer because you are going to need to lay your clay pot on its side and glue and then let that section dry. But it’s worth it because your finished project is so darn cute! Another great effect is to glue flat backed marbles onto the side of the clay pot in the shape of a grape cluster. Use silk leaves glued in place for the top of your grape cluster.
Heidi & Tiffany’s Designer Tips: If you can’t find purple flat backed marbles, just paint the back of clear marbles with purple acrylic paint and let them dry completely before gluing onto pot.
 
Decorative Clay Pot with buttons


Sizzling Hot Beaded Necklace

Metallic red and glass lamp work beads makes for a necklace that is sure to attract attention.
Materials:
  • AMACO® Polymer Clay & Craft Oven
  • AMACO® Professional Bead Roller with Baking Pins, Set #3 (used for tri-oval bead shape shown)
  • AMACO® Professional Bead Baking Rack
  • FIMO® Soft Polymer Clay — Metallic Red
  • FIMO® Gloss Lacquer
  • Ruler with Raised Numbers (recommended)
  • 32" Length, 49 Strand Bead Stringing Wire from Beadalon®
  • 2 Silver “S” Hook Style Bracelet Clasps
  • 4 Silver Attachment Rings for “S” Hooks
  • (or 9mm jump rings)
  • Silver-Toned Round Toggle Clasp
  • 3 Black and Red Glass Lamp Work Beads
  • 14 Hematite 12mm Disk Beads from Darice®:
  • 16 Black Size “E” Beads
  • 10 Silver (4mm) Round Beads
  • 6 Silver (5mm) Round Beads
  • 1 Black (5mm) Bicone Bead
  • 12 silver Crimp Beads
  • Crimping Pliers
  • Wire nippers

FIMO® Soft is sold in 2 ounce packages and is a product of EberhardFaber of Germany, exclusively distributed in North America by AMACO®
DID YOU KNOW? FIMO® Soft polymer clay can also be used to create lamp work-like beads similar to the glass lamp work beads shown here. Simply make a ball of Black clay about the size of a large pea. Roll tiny balls of Metallic Red clay and press firmly onto the Black clay ball. Bead can be left “bumpy” with the Metallic Red balls extending beyond the black ball at center, or, one a time press tiny Metallic Red balls onto black ball and roll; imbedding the balls into the Black. Add additional balls of Metallic Red as needed.
Steps:
  1. Preheat oven to 265ºF (130ºC). Knead Metallic Red FIMO® to condition. Follow instructions provided with bead rolling tool to measure clay size needed for each bead shape. Ruler with raised numbers is pressed onto clay filled top of bead rolling tool to mark. Remove clay then cut to length needed.
     
  2. Roll measured clay sections in bead roller to form five 13 x 27mm tri-oval beads. Insert piercing pin as directed to create hole needed for stringing. Place beaded piercing pins onto AMACO® Professional Bead Baking Rack and bake in oven for 40 minutes. Remove from oven and let cool completely.
     
  3. Brush beads with lacquer while still on baking pins. Place back onto baking rack to suspend until dry. Repeat to apply two additional coats of FIMO® gloss lacquer. Let dry completely then remove from baking pins. Tip: Remove any small traces of lacquer from baking pins by rubbing lightly with fine grit sandpaper.
     
  4. String two crimp beads 1/2" from end of a 12" length of beading wire; place wire end through loop on round bracelet clasp and back through both crimp beads. Use crimping pliers to flatten crimp beads approximately 1/16" from loop; securing the bracelet clasp to wire.
     
  5. String beads onto beading wire for this section of necklace in the following order: Black “E” bead, 4mm silver bead, lamp work bead, 4mm silver bead, Black “E” bead, Black 5mm bicone bead, Black “E” bead, 4mm silver bead, Metallic Red tri-oval clay bead, 4mm silver bead, Black “E” bead, three 12mm hematite disks, Black “E” bead, 4mm silver bead, lamp work bead, 4mm silver bead, then two crimp beads.
  6. Insert wire end through an “S” hook attachment ring (or 9mm jump ring) then back through crimp beads. Pull excess wire until crimp beads are approximately 1/16" from attachment ring and flatten crimp beads with crimping pliers to end this section. Trim excess wire with wire nippers.
     
  7. Follow instruction #4 to begin second section of necklace; substituting an attachment ring (or 9mm jump ring) for the round bracelet clasp.
     
  8. String beads onto wire for second section as follows: Black size “E”, two 12mm Hematite disks, Black “E”, 5mm Silver, Metallic Red trioval clay bead, 5mm Silver, Black “E”, two 12mm Hematite disks, Black “E”, 5mm Silver, Metallic Red tri-oval clay bead, 5mm Silver, Black “E”, two 12mm Hematite disks, Black “E”, 5mm Silver, Metallic Red tri-oval clay bead, 5mm Silver, Black “E”, two 12mm Hematite disks, Black “E”, then two crimp beads. Follow instruction #6 to attach an “S” hook attachment ring (or 9mm jump ring) to end this section.
     
  9. Using remaining 8" length of beading wire, follow instruction #4 to begin third section of necklace; substituting an attachment ring (or 9mm jump ring) for the round bracelet clasp.
     
  10. String beads onto wire for third section as follows: 4mm Silver bead, lamp work bead, 4mm Silver, black “E”, three 12mm Hematite disks, Black “E”, 4mm Silver, Metallic Red tri-oval clay bead, 4mm Silver, Black “E” bead then two crimp beads. Follow instruction #6; substituting bar shaped toggle end of round clasp for the attachment ring used on previous sections.
     
  11. Connect second section to first and third sections using “S” hook. For best results press “S” hook closed to prevent necklace from becoming unhooked. Use toggle ends to connect necklace when worn.


Hip Hobo Bag


The pattern for this bag has done the rounds and landed on my doorstep. It is a popular bag that is very easy to make even if you are just beginning to crochet.
I got this pattern from 
FaveCrafts.com who in turn got it from Lily Sugar n' Cream

Materials:
Yarn: Lily Sugar’n Cream Twists (56.7 g/2 oz)  6 balls of #20117 (Denim Twists)
Crochet Hook: Size 4 mm (U.S. G/6) crochet hook or size needed to obtain gauge
Plastic ring 3 ins [7.5 cm] in diameter for decoration
Size: Approx 14 ins [35.5 cm] wide x 25 ins [63.5 cm] tall.
Gauge: 15 hdc and 11 rows = 4 ins [10 cm].
Instructions:

Note: Ch 2 at beg of row does not count as st.
FRONT and BACK (make alike). 
Ch 40. 
1st row: (RS). 2 hdc in 2nd ch from hook. 1 hdc in each ch to last ch. 2 hdc in last ch. Turn. 40 hdc. 
Next 6 rows: Ch 2. 2 hdc in first hdc. 1 hdc in each hdc to last hdc. 2 hdc in last hdc. Turn. 52 hdc at end of last row. 
Next row: Ch 2. 1 hdc in each hdc to end of row. Turn. 
Rep last row for 10 ins [25.5 cm], ending with a WS row.
**Shape strap: Next row: (RS). Ch 2. 1 hdc in each of next 17 hdc. (Yoh and draw up a loop in next st) twice. Yoh and draw through all loops on hook - Hdc2tog made. Turn. Leave rem sts unworked. 18 sts. 
Next row: Ch 2. Hdc2tog over first 2 sts. 1 hdc in each hdc to end of row. Turn. 
Next row: Ch 2. 1 hdc in each hdc to last 2 sts. Hdc2tog over last 2 sts. Turn. 
Rep last 2 rows once more. 14 sts. 
Next 3 rows: Ch 2. 1 hdc in each hdc to end of row. Turn. 
Next row: Ch 2. Hdc2tog over first 2 sts. 1 hdc in each hdc to end of row. Turn. 
Rep last 4 rows 7 times more. 6 sts. 
Next row: Ch 2. 1 hdc in each hdc to end of row. Turn. 
Rep last row until strap measures 16 ins [40.5 cm], ending with a WS row. Fasten off.**
With WS of work facing, join yarn with sl st to first st. 
Work from ** to ** as given above, noting RS becomes WS.
FINISHING 
With WS of Front and Back tog, sew bottom and side seams to top of Straps.
Decorative Flap: Ch 17. 
1st row: (RS). 1 hdc in 2nd ch from hook. 1 hdc in each ch to end of ch. 15 hdc. 
Next row: Ch 2. 1 hdc in each hdc to end of row. Turn. 
Rep last row for 6 ins [18 cm], ending with a WS row.
Fold ¾ inch [2 cm] of Flap around ring and sew in position. Sew Flap to Back.
Fringe: Cut yarn, 5 ins [12.5 cm] long. Taking 2 strands tog, knot into fringe around Ring. Trim fringe evenly.

Monday, September 15, 2014

Bunny Hat


Every beginner can make this adorable Bunny hat - the crochet pattern is easy and simple! Ears stand up without additional support! You can make the hat in your favorite colors as well as in traditional white.

Sizes available:

Preemie, Newborn, 0-3 months, 3-6 months.

You will need:

Yarn bulky (chunky) weight (#5) in white and baby pink (or 2 colors of your choice)

Crochet hook L 11/ 8.0 mm or M 13 / 9.00 mm or size needed to obtain the gauge 

Gauge:  4 SC = 2’’, 5 rows = 2’’

Abbreviations and stitches used:

SC – single crochet, DC - double crochet, CH - chain, slip stitch.


You can use 2 strands of medium weight yarn (weight category #3 - such as DK or sport yarn) instead of chunky yarn. Just remember about the gauge!

The Bunny hat is a basic beanie with made separately and attached (sewn on) ears.

Start the beanie from the round bottom. The center is worked in continuous rounds. Do not join with a slip stitch at the end of each round, and do not turn at the beginning of each round. Use a stitch marker to indicate the beginning of the round, and move the marker up as work progresses.

NOTE:  if possible, use the head circumference of your baby/toddler. The given sizes are approximate because every kid is different. When you know the circumference, the diameter of the bottom of the hat will be the circumference divided by 3.14 – work in continuous rounds until you reach the needed diameter.

CH 3, join in the ring with a slip stitch.

Row #1: SC 6 in the ring, slip stitch

Row #2: 2SC in each SC all around the row. 

Row #3: [SC, 2SC], repeat [  ] 6 times. 

Preemie size: Make 1 more row: [SC 5, 2SC] repeat [  ] 3 times, skip Rows ##4-6 and go to Row #7

Row #4: [SC 2, 2SC], repeat [  ] 6 times. For the Newborn size skip Rows ##5-6 and go to Row #7

Row #5: [SC 3, 2SC], repeat [  ] 6 times. For the size 0-3 months skip Row # 6 and go to Row #7

Row #6: [SC 4, 2SC], repeat [  ] 6 times.

Row # 7: SC in each SC all around the row.

Preemie size: Make 4 more rows like Row # 7, fast off

Newborn size: Make 5 more rows like Row # 7, fast off

Size 0-3 months: Make 6 more rows like Row #7, fast off

Size 3-6 months: Make 7 or 8 more rows like Row # 7, fast off

If possible, try the beanie on to make sure the height at the forehead is enough.


CH 10
DC in the 3rd stitch
Make DC stitches till the end of the row.
Attach white yarn as shown and CH 2
Make DC in each stitch along the side of the pink center.
At the top make 3 DC stitches as shown and continue along the other side of the pink center.
Make the second bunny ear (they are exactly the same)
Bunny ears are ready - cut off the yarn and tie the knots to secure the ends.
Bunny ears should stand up without additional support - that's why it is important to sew them to the bunny hat correctly. 
Fold the ear as shown and attach the yarn. Sew through both sides to secure the fold. 
Start sewing the ear from the front
Sew on the ear around as shown.
When you are at the front side again - tie  both ends of the yarn together tight. The ear should stand up.

Sew on the second ear and the Bunny Hat is ready


Upcycling Ideas for You


These are so cool, and I never would have even considered the idea before finding the link. Large, square bricks have become the waterproof covers of little, spiral bound notebooks. It wouldn’t be that hard to do with yourself, a small blowtorch easily burning the holes. Unless you have the right kind of plastic punch tool, which you may have on hand for those who are more serious crafters. What I love is that these can be reused, filled with more paper as needed.

Taken from 
Sustainablog logo


Taken from


Taken from


Taken from