
Here are 3 ideas to use clay. There is so much you can do with clay all you need is clay and an imagination. I have taken this from
Materials:
Polymer clay canes (pre-made or handmade)
Bic ink pens (you must be able to remove the tip and ink from plastic pen body)
Glass candle cups
Assorted beads and bracelet/necklace findings
Toaster oven
Cutting blade
Instructions:
You can purchase pre-made canes online and at your local craft store. There are many instructions for making canes online.
Condition your canes by rolling and warming them in your hands. Once conditioned, using a cutting blade begin to cut thin slices. For beads have a depth of at least 1/4” to 1/2". For slices you will be applying to pen casing or candle cups your slices can be much thinner, so cut as many as you can from a cane.
You can get the large and small diameters from a can by slowly rolling it like a snake on a hard surface. For example: cut several slices while your cane is 1” in diameter; roll out to 3/4” and cut more slices; continue to roll out to 1/2" and cut slices; and so on. This will give you a nice variety of sizes when you cover a pen casing or candle cup.
For beads: cut thick slices; insert a pin to make the hole; lay on cooking sheet; place in toaster oven at temperature recommended by the polymer clay manufacturer, bake for 30 minutes or time recommended by manufacturer; allow to cool, and then string into bracelet or necklace.
For pen: remove tip/ink from pen; begin to lay slices of cane onto the pen casing using the warmth of your fingers to help the clay adhere to the plastic casing, cover entire pen casing with cane slices, but don’t cover the tip opening. Place pen onto cooking sheet, place in toaster oven at temperature recommended by manufacturer, bake 30 minutes or time suggested by manufacturer, allow to cool and then insert tip/ink back into pen.
For glass candle cups: begin to lay slices of cane onto the outside body of glass candle cup using the warmth of your fingers to help the clay adhere to the glass, cover entire glass candle cup with cane slices. Place glass candle cup onto cooking sheet, place in toaster oven at temperature recommended by manufacturer, bake 30 minutes or time suggested by manufacturer, and allow to cool.
Please remember that anything the polymer clay touches can no longer be used for food consumption and you should never leave baking polymer clay unattended.
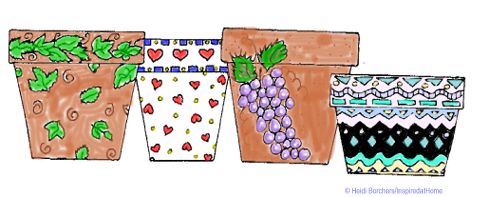
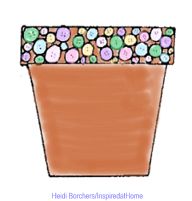
How to Decorate Clay Pots
Materials:
- Clay pots
- Acrylic paint (there is a specialty patio paint that also works well for this technique)
- Paint palette (a glass or plastic plate works great for this and is great because it can be reused)
- Pop-up sponges
- Black permanent marking pen
- Mosaic tiles (glass or plastic)
- Mosaic glue
- Grout
- Plastic gloves (for grouting)
- Wet wipes
- Flat backed marbles
- Silk leaves
Instructions:
Instructions for Stamping & Painting on Clay Pots
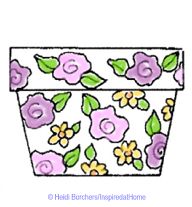
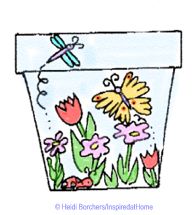
Cut pop-up sponge to desired shapes. A simple scalloped circle makes a great floral rose shape. Dip sponge into water and wring out excess. Pour paint onto palette. Dab sponge into paint. Keep dabbing in an up and down motion to evenly coat the surface of the sponge with paint. Determine placement on clay pot and press sponge and lift. Voila! It’s that easy. Continue until entire clay pot surface is covered. Let dry completely. Use black marking pen to outline design shapes and add detail to leaves and center of flowers. If you want to paint your own design, just transfer the pattern to your clay pot and paint, paint, paint!
Cut pop-up sponge to desired shapes. A simple scalloped circle makes a great floral rose shape. Dip sponge into water and wring out excess. Pour paint onto palette. Dab sponge into paint. Keep dabbing in an up and down motion to evenly coat the surface of the sponge with paint. Determine placement on clay pot and press sponge and lift. Voila! It’s that easy. Continue until entire clay pot surface is covered. Let dry completely. Use black marking pen to outline design shapes and add detail to leaves and center of flowers. If you want to paint your own design, just transfer the pattern to your clay pot and paint, paint, paint!
Designer Tips: Keep in mind that if you want to use lighter colors of acrylic paint on the clay pot, you may need to first spray the outside of the pot with white Rustoleum paint for a base coat.
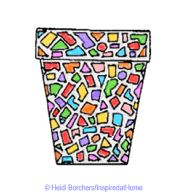
Instructions for Mosaicing on Clay Pots
Working one section at a time, glue mosaic tiles onto outside surface of pot leaving small spaces in between tiles. Let glue dry completely. Mix grout according to package instructions. Apply grout over tile. Wipe off excess grout with sponge. Continue to clean surface of tiles with wet wipes. Let grout dry overnight and clean tiles with paper towel and Windex. (See Mosaic Techniques)
Working one section at a time, glue mosaic tiles onto outside surface of pot leaving small spaces in between tiles. Let glue dry completely. Mix grout according to package instructions. Apply grout over tile. Wipe off excess grout with sponge. Continue to clean surface of tiles with wet wipes. Let grout dry overnight and clean tiles with paper towel and Windex. (See Mosaic Techniques)
Designer Tips: If you want help your tiles stay in place while drying, just use a long strip of blue painters tape to hold sections in place. When the glue is dry, carefully remove the tape.
Instructions for Gluing on Clay Pots
Select buttons or beads to glue along the top rim of clay pot. This project can take a little longer because you are going to need to lay your clay pot on its side and glue and then let that section dry. But it’s worth it because your finished project is so darn cute! Another great effect is to glue flat backed marbles onto the side of the clay pot in the shape of a grape cluster. Use silk leaves glued in place for the top of your grape cluster.
Select buttons or beads to glue along the top rim of clay pot. This project can take a little longer because you are going to need to lay your clay pot on its side and glue and then let that section dry. But it’s worth it because your finished project is so darn cute! Another great effect is to glue flat backed marbles onto the side of the clay pot in the shape of a grape cluster. Use silk leaves glued in place for the top of your grape cluster.
Heidi & Tiffany’s Designer Tips: If you can’t find purple flat backed marbles, just paint the back of clear marbles with purple acrylic paint and let them dry completely before gluing onto pot.
Sizzling Hot Beaded Necklace
Metallic red and glass lamp work beads makes for a necklace that is sure to attract attention.

Materials:
- AMACO® Polymer Clay & Craft Oven
- AMACO® Professional Bead Roller with Baking Pins, Set #3 (used for tri-oval bead shape shown)
- AMACO® Professional Bead Baking Rack
- FIMO® Soft Polymer Clay — Metallic Red
- FIMO® Gloss Lacquer
- Ruler with Raised Numbers (recommended)
- 32" Length, 49 Strand Bead Stringing Wire from Beadalon®
- 2 Silver “S” Hook Style Bracelet Clasps
- 4 Silver Attachment Rings for “S” Hooks
- (or 9mm jump rings)
- Silver-Toned Round Toggle Clasp
- 3 Black and Red Glass Lamp Work Beads
- 14 Hematite 12mm Disk Beads from Darice®:
- 16 Black Size “E” Beads
- 10 Silver (4mm) Round Beads
- 6 Silver (5mm) Round Beads
- 1 Black (5mm) Bicone Bead
- 12 silver Crimp Beads
- Crimping Pliers
- Wire nippers
FIMO® Soft is sold in 2 ounce packages and is a product of EberhardFaber of Germany, exclusively distributed in North America by AMACO®
DID YOU KNOW? FIMO® Soft polymer clay can also be used to create lamp work-like beads similar to the glass lamp work beads shown here. Simply make a ball of Black clay about the size of a large pea. Roll tiny balls of Metallic Red clay and press firmly onto the Black clay ball. Bead can be left “bumpy” with the Metallic Red balls extending beyond the black ball at center, or, one a time press tiny Metallic Red balls onto black ball and roll; imbedding the balls into the Black. Add additional balls of Metallic Red as needed.
Steps:
- Preheat oven to 265ºF (130ºC). Knead Metallic Red FIMO® to condition. Follow instructions provided with bead rolling tool to measure clay size needed for each bead shape. Ruler with raised numbers is pressed onto clay filled top of bead rolling tool to mark. Remove clay then cut to length needed.
- Roll measured clay sections in bead roller to form five 13 x 27mm tri-oval beads. Insert piercing pin as directed to create hole needed for stringing. Place beaded piercing pins onto AMACO® Professional Bead Baking Rack and bake in oven for 40 minutes. Remove from oven and let cool completely.
- Brush beads with lacquer while still on baking pins. Place back onto baking rack to suspend until dry. Repeat to apply two additional coats of FIMO® gloss lacquer. Let dry completely then remove from baking pins. Tip: Remove any small traces of lacquer from baking pins by rubbing lightly with fine grit sandpaper.
- String two crimp beads 1/2" from end of a 12" length of beading wire; place wire end through loop on round bracelet clasp and back through both crimp beads. Use crimping pliers to flatten crimp beads approximately 1/16" from loop; securing the bracelet clasp to wire.
- String beads onto beading wire for this section of necklace in the following order: Black “E” bead, 4mm silver bead, lamp work bead, 4mm silver bead, Black “E” bead, Black 5mm bicone bead, Black “E” bead, 4mm silver bead, Metallic Red tri-oval clay bead, 4mm silver bead, Black “E” bead, three 12mm hematite disks, Black “E” bead, 4mm silver bead, lamp work bead, 4mm silver bead, then two crimp beads.
- Insert wire end through an “S” hook attachment ring (or 9mm jump ring) then back through crimp beads. Pull excess wire until crimp beads are approximately 1/16" from attachment ring and flatten crimp beads with crimping pliers to end this section. Trim excess wire with wire nippers.
- Follow instruction #4 to begin second section of necklace; substituting an attachment ring (or 9mm jump ring) for the round bracelet clasp.
- String beads onto wire for second section as follows: Black size “E”, two 12mm Hematite disks, Black “E”, 5mm Silver, Metallic Red trioval clay bead, 5mm Silver, Black “E”, two 12mm Hematite disks, Black “E”, 5mm Silver, Metallic Red tri-oval clay bead, 5mm Silver, Black “E”, two 12mm Hematite disks, Black “E”, 5mm Silver, Metallic Red tri-oval clay bead, 5mm Silver, Black “E”, two 12mm Hematite disks, Black “E”, then two crimp beads. Follow instruction #6 to attach an “S” hook attachment ring (or 9mm jump ring) to end this section.
- Using remaining 8" length of beading wire, follow instruction #4 to begin third section of necklace; substituting an attachment ring (or 9mm jump ring) for the round bracelet clasp.
- String beads onto wire for third section as follows: 4mm Silver bead, lamp work bead, 4mm Silver, black “E”, three 12mm Hematite disks, Black “E”, 4mm Silver, Metallic Red tri-oval clay bead, 4mm Silver, Black “E” bead then two crimp beads. Follow instruction #6; substituting bar shaped toggle end of round clasp for the attachment ring used on previous sections.
- Connect second section to first and third sections using “S” hook. For best results press “S” hook closed to prevent necklace from becoming unhooked. Use toggle ends to connect necklace when worn.
No comments:
Post a Comment